A Godot 4 plugin to easily create and animate slides
|
|
10 tháng trước cách đây | |
|---|---|---|
| doc | 2 năm trước cách đây | |
| godot | 10 tháng trước cách đây | |
| .gitattributes | 2 năm trước cách đây | |
| .gitignore | 10 tháng trước cách đây | |
| LICENSE.txt | 2 năm trước cách đây | |
| README.md | 10 tháng trước cách đây |
README.md
Godot Slide Show Plugin
A plugin to easily create and animate slides in Godot 4.
This plugin is small, stable and adaptable.
This plugin was initially developed for my talk about Godot for the JDLL event. This complete project is also publicly available. The animated gif below shows how it works.
Features
A slide is a scene
Leverage the Godot scene system by providing a custom Slide node to use as root for your slide scene. Then you are free to add anything in your slide scene. Don't forget to include it as a child of your Show node in your main scene.
Smooth and customizable transitions between slides
A custom Camera2D node named Focus handles transitions, tweening position and scale. Transition can be customized via the Focus node.
The Focus is auto-detected by the Show node, and must rely at the same level in your scene tree.
React to input : next, skip, previous, home slide
You can customize those events by providing your custom action names in the Show node.
Click on a slide gives it focus
If you want to target a specific slide you see, juste click on it with your mouse.
How to use
This repository contains a minimalist example made with Godot 4.0.2. You can clone this project and open the godot folder with Godot 4+.
Basics
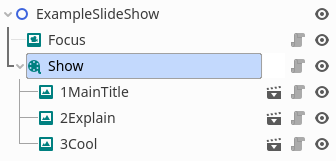
Basic node arrangement in your main scene.
1. Install the plugin
Add or merge the addons folder with the one at the top of your own project.
Check the official documentation about installing a plugin to have more details.
2. Create your main scene
Create your main global scene.
3. Instantiate a Focus
Instantiate the Focus node, playing the role of a custom Camera2D.
4. Instantiate a Show
Instantiate the Show node, that must be next to the Focus node that will be auto-detected.
5. Create your own Slides by creating Scene based on Slide node
To create and edit a slide, create a new scene with the Slide node as root node. You can add any Node in your slide scene, like a Label or a Sprite2D.
6. Instantiate your slides as children of Show
To add the slide to your show, instantiate it in your main scene as a child of your Show node. Put only Slide scenes as children of the Show. The order of the children determines the sequence of slides.
You are ready to run your own slideshow ! :tada:
7. Play your game
Run your slide show!
Default controls :
- Enter
ui_accept: go smoothly to next slide - Right arrow
ui_right: go to next slide without transition - Left arrow
ui_left: go to previous slide without transition - Escape
ui_cancel: go to the starting slide - Mouse click : go smoothly to the nearest slide from click position
Advanced features
Start from another slide
If you want to specify a starting slide, you can specify its index via the inspector. Can be useful to experiment parts of your slideshow.
Hide slides before they got focus
To reveal slides on focus, check the hide slides in the Show. If you want some slides to remain always visible, chek always visible on the corresponding slide.
Customize input map
You can create your own actions, and give them to the Show node via the input setup section in the inspector.
Export your slides
The plugin leverages the Godot Movie Maker to easily export every slides to png files.
This feature can be useful when you need to share your work without the hassle to download your project and set up Godot. The exported slides can be used as a backup, or can be cliped into a video for instance.
- Set up your export path in the Project settings > Editor > Movie maker (make sure the folder exists, and specify png), e.g.
../dist/export/slide.png; - Enable the movie mode ;
- Run the project : the
Showwill quickly review every slide, and quit when the last one is reached ; - It's already done : your slides are available in your export folder, with one png file for each slide.
Note : the resolution of your exported slides are related to the resolution set up in your project.
Warning : pay attention to the window resolution, especially if you are using a tiling windows manager!
The export automation is enabled with two toggles in the Show node, in the Export section :
- One Slide per Frame : automatically go to next slide at each frame ;
- Quit after last slide : automatically quit the game after the last slide is reached.
Note : the export settings are effective only when the Movie Maker mode is enabled.
License
This plugin is free software licensed under the MIT license, the same license used by the Godot engine itself.
See LICENSE.txt.

